Installation
ABBA is an application offering both a graphic user interface (GUI) and a command line interface (CLI) that works as plugin of Fiji, a common image-processing software used in health sciences.
In addition, we also offer a QuPath extension that helps importing the region annotations that were registered with ABBA.
Hint
The QuPath extension, while optional, is highly recommended. It simplifies dataset definition and post-registration analysis.
ABBA plugin for Fiji
Tip
For Windows users, a standalone installer is available, which simplifies the installation process.
ABBA can be directly installed from Fiji’s interface as a plugin, but depending from your needs you might want to follow a different installation method to unlock additional functionalities, namely:
BrainGlobe: a Python library that extends the atlases available in ABBA.
DeepSlice: a deep-learning-based method for automatic registration of coronal sections to mouse and rat brain atlases. Its integration with ABBA can work both online (i.e. it uploads your downscaled images to DeepSlice’s servers, requiring an internet connection) and offline (i.e. it runs the model locally, on your computer).
There are three methods to control ABBA installation within Fiji:
using a standalone installer for Windows;
using a Fiji installation;
using a Python virtual environment to manage the correct versions of
abba-python,brainglobe-atlasapianddeepslice.
The tables below summarize the functionality available for each installation method across different operating systems:
Windows |
Method 1 |
Method 2 |
Method 3 |
|---|---|---|---|
CLI |
✅ |
✅ |
✅ |
GUI |
✅ |
✅ |
✅ |
Default atlases |
✅ |
✅ |
✅ |
BrainGlobe atlases |
✅ |
❌ |
✅ |
DeepSlice (online) |
✅ |
✅ |
✅ |
DeepSlice (local) |
✅ |
Optional |
Optional |
Linux |
Method 1 |
Method 2 |
Method 3 |
|---|---|---|---|
CLI |
❌ |
✅ |
✅ |
GUI |
❌ |
✅ |
✅ |
Default atlases |
❌ |
✅ |
✅ |
BrainGlobe atlases |
❌ |
❌ |
✅ |
DeepSlice (online) |
❌ |
✅ |
✅ |
DeepSlice (local) |
❌ |
Optional |
Optional |
MacOS |
Method 1 |
Method 2 |
Method 3 |
|---|---|---|---|
CLI |
❌ |
✅ |
✅ |
GUI |
❌ |
✅ |
❌ |
Default atlases |
❌ |
✅ |
✅ |
BrainGlobe atlases |
❌ |
❌ |
✅ |
DeepSlice (online) |
❌ |
✅ |
✅ |
DeepSlice (local) |
❌ |
Optional |
Optional |
NOTE: an internet connection is required during the installation.
Method 1 - Windows installer
Windows users can use an automatic installer that sets everything up into an installation with all optional features enabled. This is the simplest solution, albeit the one receiving updates the least frequently.
Method 2 - Fiji plugin manager
This method gets updates the fastest, and they can be installed directly using Fiji’s Updater (i.e., Help > Update...).
Step 1. Download and install Fiji
If Fiji is not already installed, download it from fiji.sc and install it.
Step 2. Add necessary update site
click
Help > Update... > Manage update sites;tick the checkbox
PTBIOP;optional: tick the checkbox
OMERO 5.5-5.6
This step is necessary only if you want to use ABBA on images saved on an OMERO server;click
Apply and closethenApply changes;restart Fiji.
Step 3. Install elastix/transformix
elastix, a toolbox for 2D in-plane registration, is an indipendent program that is executed by ABBA under the hood in order to apply affine and spline transformations to the images.
download elastix version 5.2.0 for your operating system;
extract it to a convenient location (e.g.,
C:\on Windows,/opt/on Linux,Applicationson MacOS).
Windows
Download Visual C++ redistributable (vc_redist.x64.exe for 64-bit systems) and install it.
Warning
If you are updating Fiji and switch from elastix 5.0.1 to elastix 5.2.0, make sure you have the latest version installed. Otherwise elastix will not work.
Linux
No special steps are required.
MacOS
Since macOS treats elastix and transformix as software from “unknown developers,” you need to create security exceptions for both executables to bypass repeated warnings.
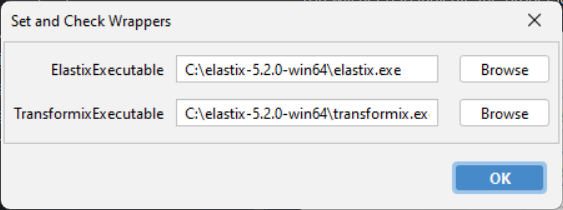
Step 5. Set elastix paths in Fiji
Now you have to tell Fiji where to find your installation of elastix and transformix by clicking on Plugins › BIOP › Elastix > Test elastix. When asked, specify the paths of elastix and transformix executables. For instance:
In Fiji’s console (Window > Console, if closed), you should see a confirmation messages like:
[INFO] Elastix	->	set :-)
Transformix	->	set :-)
Lastly, you will be asked to start a registration test. Run it and check its result.
Step 6. Install DeepSlice locally [optional]
While you can use the default web-based DeepSlice interface, installing it locally can streamline the registration process.
To install DeepSlice locally, please follow the instructions specified in the BIOP wrappers repository. In brief, the installation consists of:
installing miniforge;
adding conda to the PATH environment variable (Windows only);
creating a conda environment for
deepslice;specifying the conda environment location in Fiji.
Method 3 - Installing ABBA plugin in python
ABBA can also be installed within a python environment thanks to abba-python. This method adds support to BrainGlobe’s additional atlases.
For the installation instructions refer to the project’s page.
ABBA extension for QuPath
QuPath 0.6
if QuPath is not already installed, download it and install it;
The ABBA extension is distributed into QuPath via a the QuPath-BIOP catalog. This catalog is NOT enabled by default in QuPath. In order to add it to the list of available catalogs:
Open QuPath
Go to Extensions → Manage extensions
Click Manage extension catalogs
Enter the catalog URL:
https://github.com/BIOP/qupath-biop-catalogBrowse and install the latest abba extension by clicking its (+) button
Make sure to restart QuPath
Note
Note that the BraiAn extension is available via the catalog https://github.com/carlocastoldi/qupath-extension-braian-catalog
Note
If you’re using OMERO for your data, you’ll need to install the QuPath OMERO extension with optional dependencies. You need to import your images in OMERO by using the Ice API.
QuPath 0.5 (legacy - no bug fix)
if QuPath is not already installed, download it and install it;
download the version 0.3.3 ABBA extension zip file (named
qupath-extension-abba-0.3.3.zip);unzip it;
drag-and-drop the
.jarfiles into QuPath’s main window;
Note
If you’re using OMERO for your data, you’ll need the QuPath OMERO RAW extension. Follow the installation guide.
Restart QuPath.
You should now see the following extensions under Extensions > Manage extensions:
ABBA
Image Combiner Warpy
Warpy
OMERO BIOP [optional]